


Fouled disc diffusers quietly drain your aeration budget. Header pressure climbs, dissolved oxygen drops, and blower power rises - yet most plants reach for a chemical before confirming what is actually blocking the membrane. This guide gives you the complete Juntai maintenance system for EPDM disc diffusers (DD215, DD270, DD350): five rules that prevent fouling in the first place, a monitoring schedule that catches problems early, a stepwise physical and chemical cleaning procedure starting at 3 wt% formic acid, and a clean-or-replace decision tree that stops you wasting acid on membranes that are already finished.
Quick Model Reference
Three EPDM membrane disc diffuser sizes cover most municipal and industrial aeration basins. Use the approved project datasheet and layout drawing if they specify different operating limits.
| Parameter | DD215 | DD270 | DD350 |
| Disc diameter | 7 in (215 mm) | 9 in (270 mm) | 12 in (350 mm) |
| Recommended flow range | 1.0-5.0 m³/h | 1.5-7.0 m³/h | 2.5-10.0 m³/h |
| Design airflow range | 0.5-2.5 m³/h | 2.5-5.0 m³/h | 4.0-7.0 m³/h |
| Connection | 3/4 in NPT male | 3/4 in NPT male | 3/4 in NPT male |
| Standard membrane | EPDM | EPDM | EPDM |


Five Rules to Minimize Fouling
Fouling is almost always a symptom of an operating habit, not a random event. Fix these five behaviors and you prevent most membrane deposits before they form.
| Rule | Practical requirement |
| 1. Keep airflow stable | Avoid unnecessary short on/off cycling. Where the process permits, continuous aeration is preferred. For intermittent operation, use controlled cycles and a planned purge routine. |
| 2. Stay within approved airflow | Low airflow can leave part of the membrane inactive and encourage deposits. Excess airflow increases pressure loss and may shorten membrane life. |
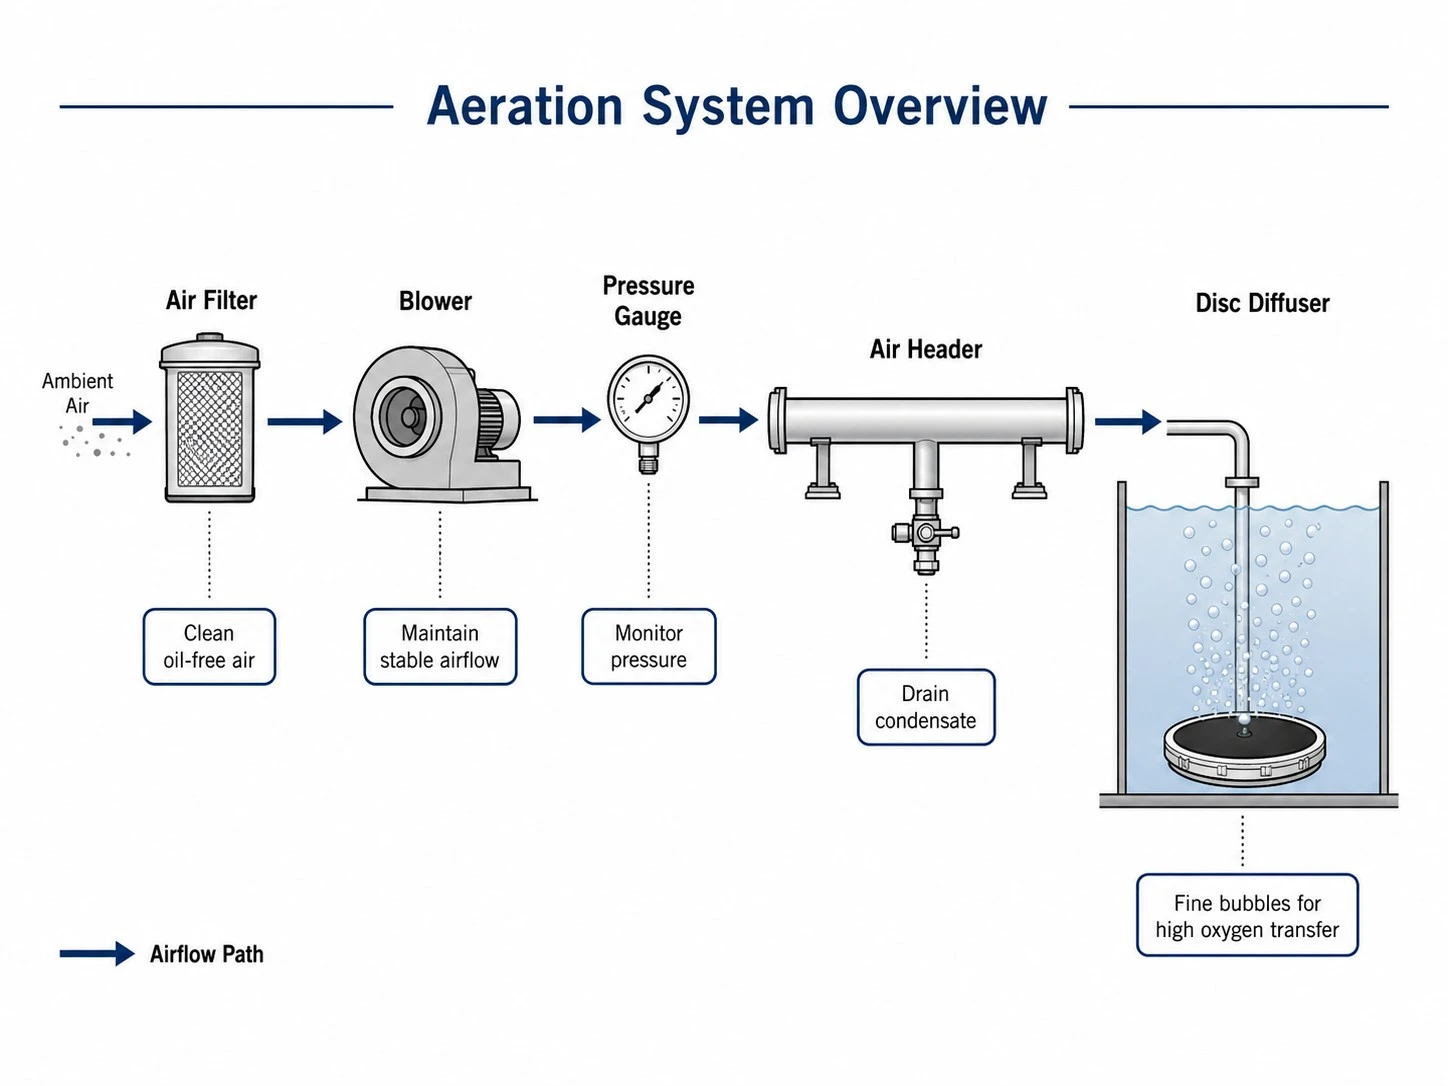
| 3. Supply clean, oil-free air | Maintain blower inlet filtration and prevent dust, oil, rust and construction debris from entering the air header. |
| 4. Drain condensate / prevent backflow | Check low-point drains and check valves. Water trapped in the air piping can cause uneven aeration and false signs of diffuser blockage. |
| 5. Keep the membrane wet | During shutdown or basin drainage, do not allow sludge to dry on the membrane. Rinse promptly or keep diffusers submerged. |
When to Inspect or Clean
Before cleaning anything, learn to read the signs. Each observable change points to a different cause - and the correct first response is not always a chemical.
| Observed change | What it may indicate | Recommended response |
| Header pressure rises at the same airflow and water depth | Fouling, scale, air-side restriction or condensate | Check the air supply system first; compare against the clean baseline. |
| More air is required to maintain the same DO | Reduced diffuser performance, process load change or air-supply limitation | Confirm process loading and blower output before cleaning. |
| Bubble pattern becomes uneven, localized or coarser | Fouling, membrane damage, air leak or uneven distribution | Inspect the affected zone and identify the deposit or damage. |
| Blower power, temperature or noise increases | Increasing system resistance or blower/filter issue | Check filter, valves, condensate and piping restrictions. |
| Visible deposits appear on the membrane | Biological growth, mineral scale, solids or chemical contamination | Identify deposit type before choosing any chemical. |
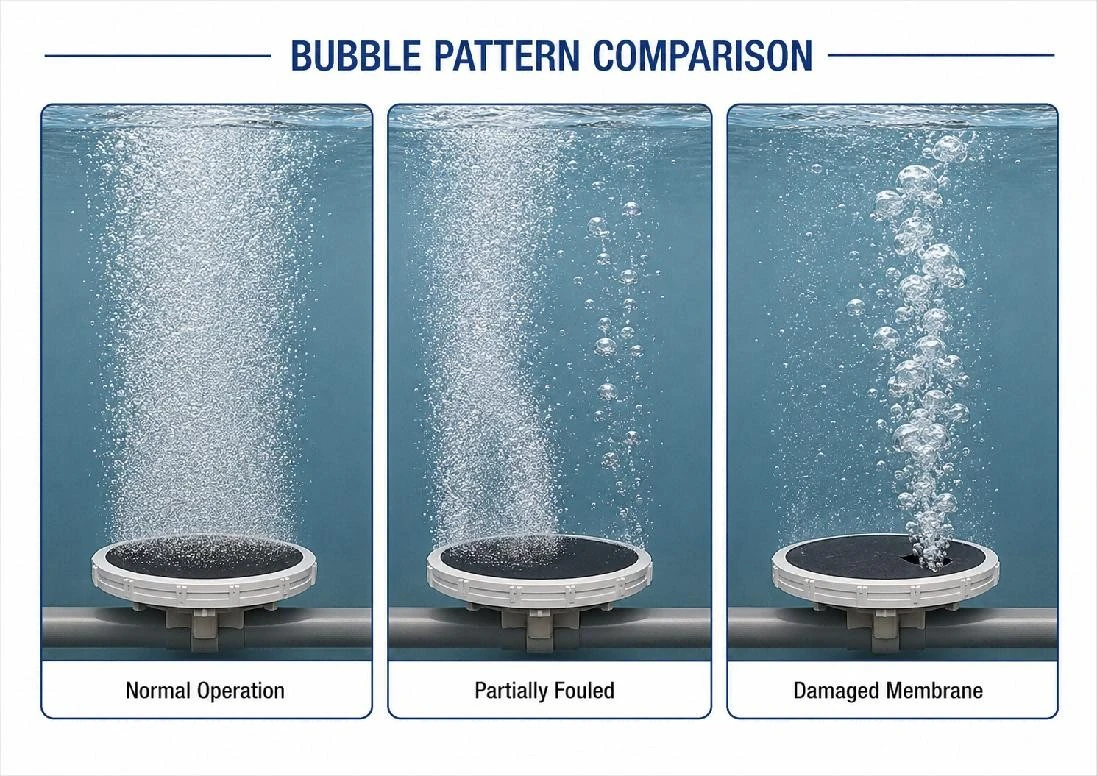
Bubble pattern comparison: normal operation, partial fouling, and membrane damage.
Recommended Monitoring Schedule
| Item | Suggested frequency | Check / record |
| Blower status and alarms | Weekly or monthly | Noise, temperature, alarms, duty/standby status. |
| Header pressure and airflow | Monthly | Compare with the clean baseline at similar water depth and airflow. |
| Inlet filter and condensate drains | Every 1-3 months | Filter condition, pressure drop and accumulated water. |
| Bubble pattern | Every 3-6 months where visible | Uniformity, coarse bubbles and inactive zones. |
| Physical diffuser inspection | Annually or when performance changes | Deposits, elasticity, cracks, doming and seals. |
At commissioning, record a clean-system baseline: water depth, airflow, header pressure, blower current, bubble pattern and DO performance. Future cleaning decisions should be based on normalized comparison with this baseline, not on one pressure value alone.
Identify the Problem Before Cleaning
The deposit you can see is only the first clue. Match the appearance to the likely cause before you choose a cleaning route - this table is the fastest way to avoid an unnecessary acid wash.
| Appearance / symptom | Likely cause | First action | Chemical cleaning? |
| Soft, slimy or moss-like layer | Biological fouling | Rinse with clean water and gently brush with a soft nylon brush. | Normally NO as first response. |
| White or grey hard granular scale | Calcium / magnesium carbonate scale | Physical cleaning first; perform a small deposit reactivity test. | YES, if acid-reactive scale remains. |
| Brown, orange or black deposit | Iron / manganese or mixed inorganic deposit | Check wastewater chemistry and, if possible, analyze a deposit sample. | CASE-SPECIFIC; do not choose acid from color alone. |
| Mud, fibres or settled solids | Long shutdown, poor mixing or pretreatment | Remove solids physically and correct the operating cause. | NO. |
| Sticky, swollen or softened membrane | Oil, solvent or incompatible chemical exposure | Stop the contamination source and replace the membrane. | NO. |
| No visible deposit but high pressure | Filter, valve, condensate, rust or air-side debris | Check blower, filter, valves and piping before accessing diffusers. | NO, unless scale is later confirmed. |
| Localized large bubbles | Air leak, loose connection or damaged membrane | Inspect and repair or replace damaged parts. | NO. |
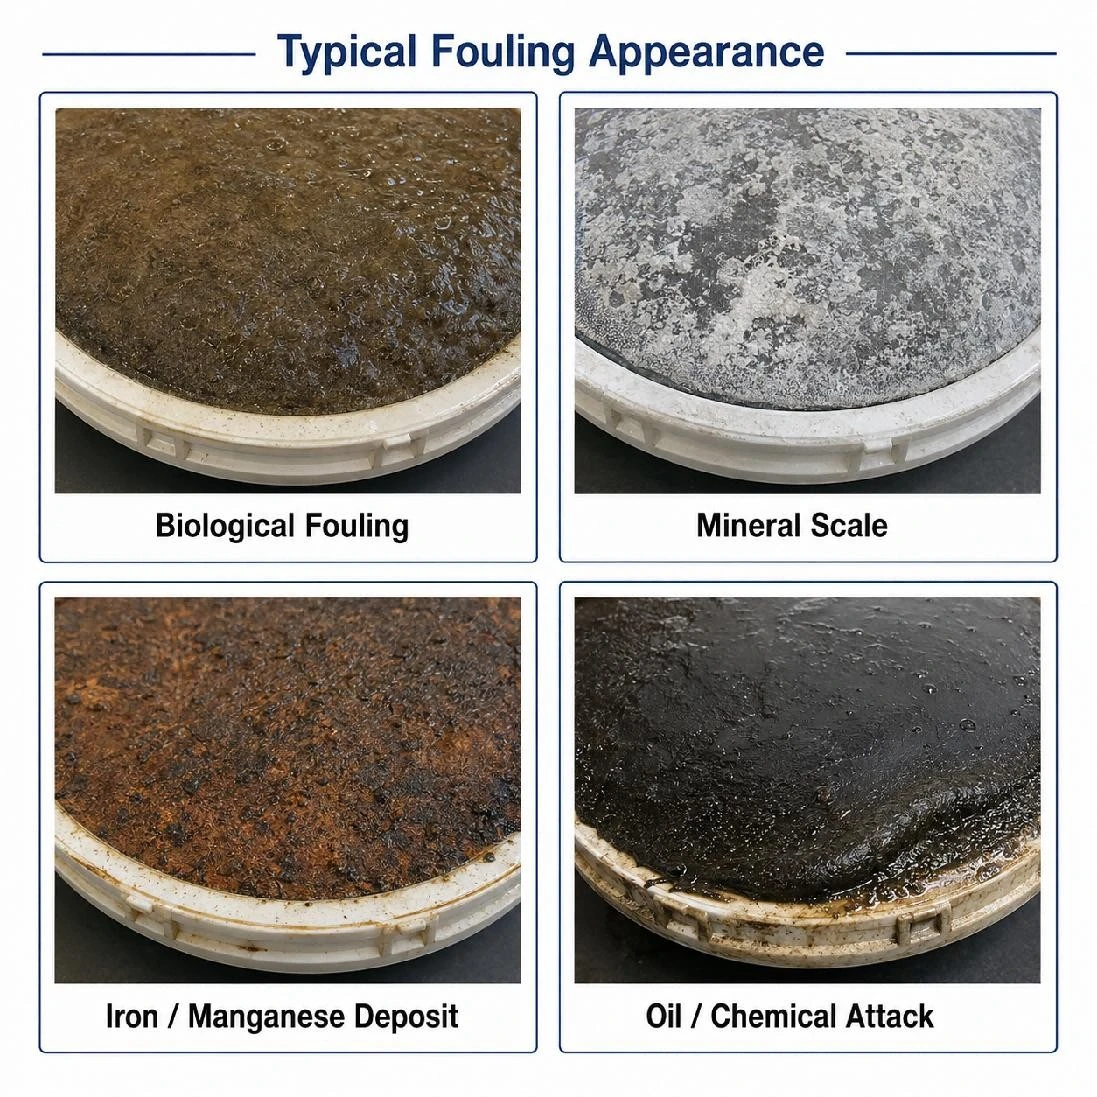
Typical fouling appearances. Visual appearance is useful for screening but is not a complete chemical diagnosis.
Simple scale confirmation: remove a small scraping of the deposit into a separate non-metallic cup. Add a few drops of a dilute organic-acid cleaning solution. Visible effervescence strongly suggests carbonate scale. Do not perform this test by pouring acid directly onto an installed membrane.
Cleaning Decision
- Record current pressure, airflow, water depth, blower condition and bubble pattern.
- Check blower output, inlet filter, valves, check valves, condensate drains, air leaks and pipe restrictions.
- If permitted by the approved operating limits, perform a controlled air purge and recheck performance.
- If the problem remains, inspect the membrane and identify the deposit type.
- Biological / loose solids → physical cleaning. Hard acid-reactive scale → chemical cleaning. Chemical attack / damage → replacement.
- After cleaning or replacement, record pressure, airflow and bubble pattern and compare with the clean baseline.
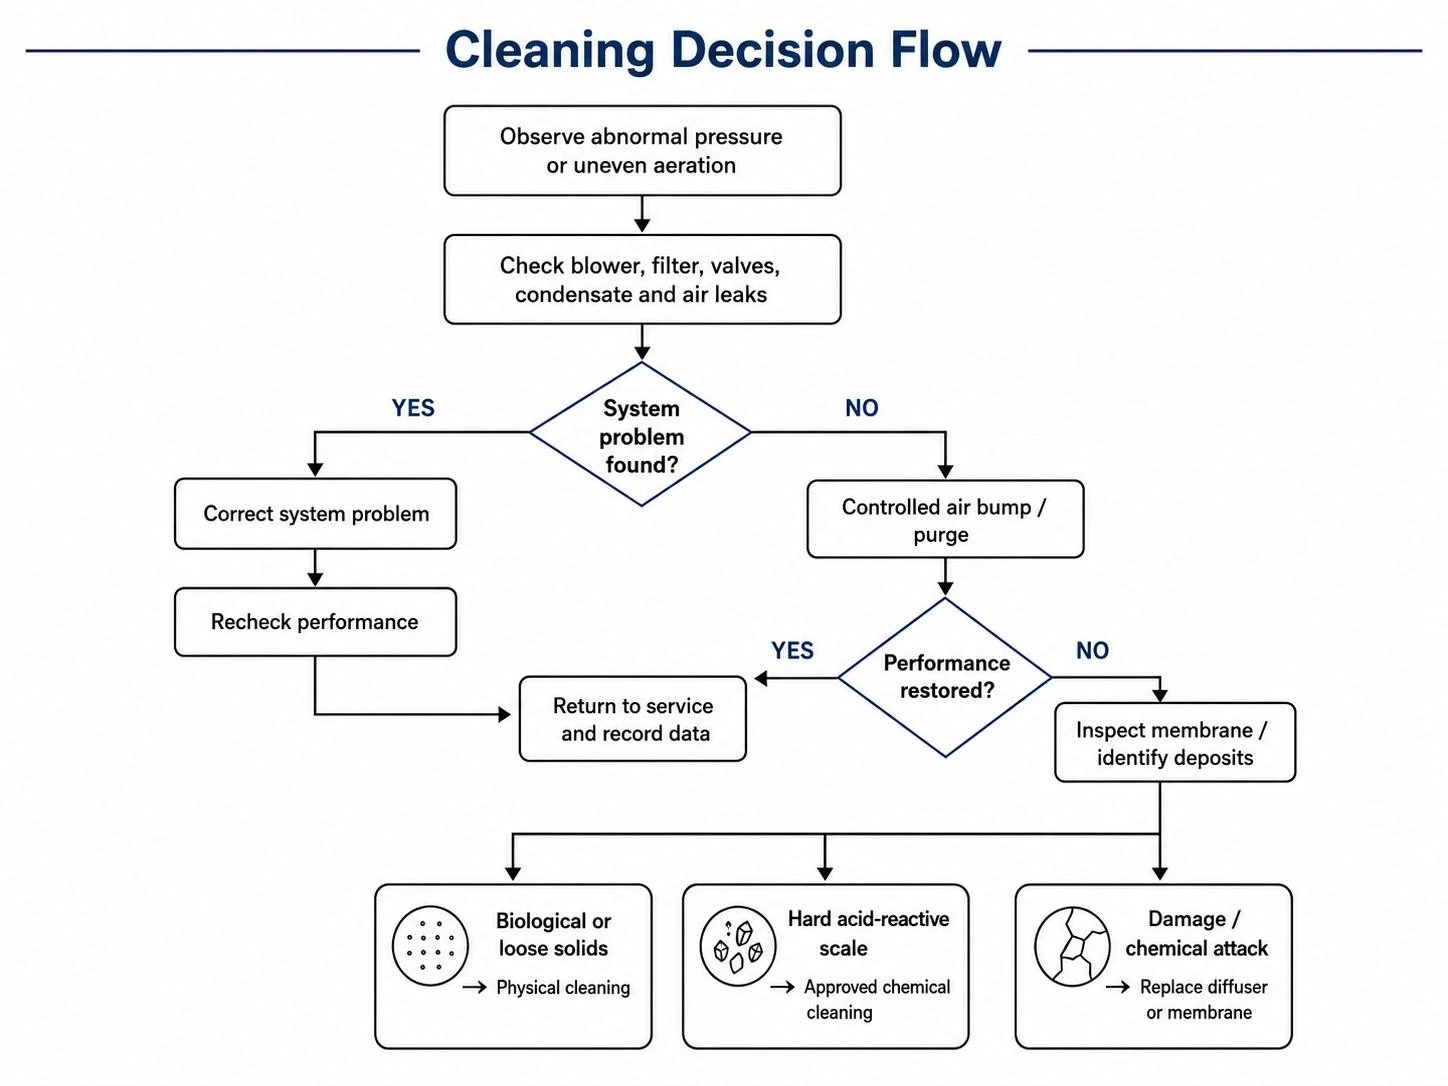
A chemical should never be selected only because "the diffuser is blocked." First determine whether the restriction is in the blower/air piping, on the membrane surface, within the membrane slits, or due to membrane damage.
Physical Cleaning - First-Line Method
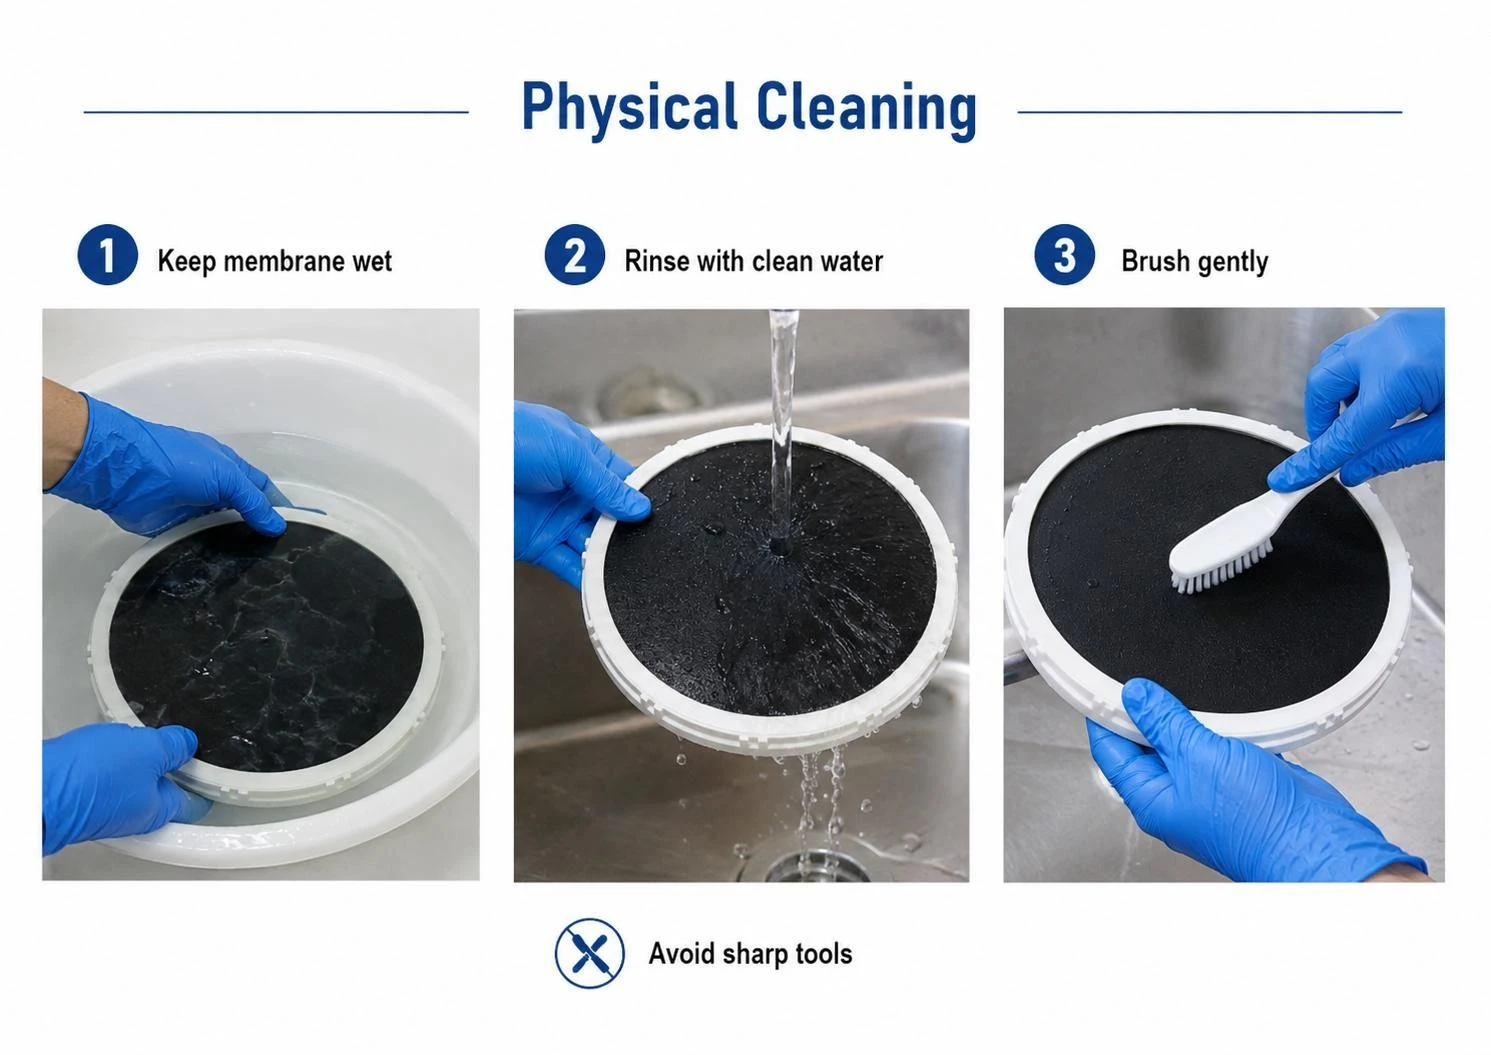
For biological fouling and loose solids, physical cleaning is the correct first step. It removes the deposit without chemicals and without risk to the membrane compound.
| Step | Instruction |
| 1. Isolate and access | Shut off and depressurize the affected zone. Follow the approved site access and confined-space procedure. |
| 2. Keep membrane wet | Do not allow sludge or biological deposits to dry on the membrane. |
| 3. Rinse loose solids | Use clean water and a low-impact, wide spray. |
| 4. Brush gently | Use a soft nylon-bristle brush. Do not use steel brushes, knives, scrapers or abrasive pads. |
| 5. Detergent only if needed | Use only a mild, pH-neutral, membrane-compatible detergent diluted according to its supplier instructions. Do not use petroleum or solvent cleaners. |
| 6. Rinse and inspect | Check for cracks, tears, swelling, hardening, permanent doming and loose seals. |
| 7. Air purge and test | Reinstall, check for leaks, then operate at the highest airflow permitted by the approved model/project limits for approximately 5 minutes. Recheck bubble uniformity, pressure and airflow. |
Pressure washing is not the preferred method. If unavoidable, use a wide spray pattern, maintain sufficient distance and never direct a concentrated jet at membrane slits, the sealing edge or the integral check-valve area.
Chemical Cleaning - What to Use and When
Chemical cleaning is intended primarily for hard, acid-reactive mineral scale that remains after physical cleaning. It is not a substitute for correcting air-side restrictions, biological sludge accumulation, oil exposure, membrane aging or mechanical damage.
| Fouling / condition | Preferred action | Chemical guidance | Contact / decision |
| Soft biological film or loose sludge | Water rinse + soft brushing | No acid as first-line treatment. Optional mild pH-neutral detergent only if needed. | Re-test after physical cleaning. |
| Calcium / magnesium carbonate scale | Physical cleaning, then acid cleaning if scale remains | Preferred: formic acid. Alternative: acetic acid. Use only a controlled dilute working solution for off-line cleaning. | Use the stepwise SOP below. |
| Iron / manganese or mixed industrial deposits | Analyze water/deposit chemistry | Do not prescribe a chemical from appearance alone. Submit data to Juntai. | Site-specific. |
| Silica, sand, fibres, air-side dust | Mechanical removal / air-system correction | Acid is generally ineffective for these solids. | Correct root cause. |
| Oil, solvent, sticky/swollen membrane | Stop contamination and replace membrane | Do not attempt chemical restoration. | Replace. |
| Cracked, brittle, permanently domed membrane | Replace membrane | Chemical cleaning will not correct mechanical aging. | Replace. |
The standard chemical procedure below applies only to Juntai standard EPDM membrane disc diffusers after all wetted components are confirmed compatible. It does not automatically apply to silicone, TPU, PTFE-coated, specialty elastomer or customer-specified membranes. Before the first chemical cleaning at a site, Juntai recommends a compatibility/cleaning trial on one spare or removed membrane. The 3-5 wt% off-line range below is a conservative starting range; site chemistry and the actual membrane compound can change the optimum concentration and contact time.
8.1 Off-Line Acid Cleaning - Standard Starting Procedure
| Parameter | Recommended starting condition |
| Cleaning agent | Formic acid (preferred) or acetic acid (alternative). |
| Working concentration | Start at 3 wt% active acid. For persistent carbonate scale, increase to 5 wt% active acid. |
| Solution temperature | Ambient, preferably 10-30°C. Do not heat the acid bath. |
| Initial contact time | 20 minutes at 3 wt%. |
| Escalation | If scale remains and the membrane is unchanged, use 5 wt% for an additional 20-30 minutes. |
| Maximum single-session contact | 60 minutes total without separate Juntai approval. |
| Mechanical action | Gentle solution movement or very light brushing only; do not stretch the membrane. |
| Stop criteria | Stop immediately if the membrane becomes sticky, swollen, unusually soft/hard, discolored, cracked or permanently deformed. |
| Post-cleaning rinse | Rinse thoroughly with clean water until the rinse pH is close to the incoming clean-water pH. |
| Return to service | Reinstall, leak-check, then air purge for ~5 minutes within approved airflow limits; record pressure, airflow and bubble pattern. |

8.2 How to Prepare the Working Solution
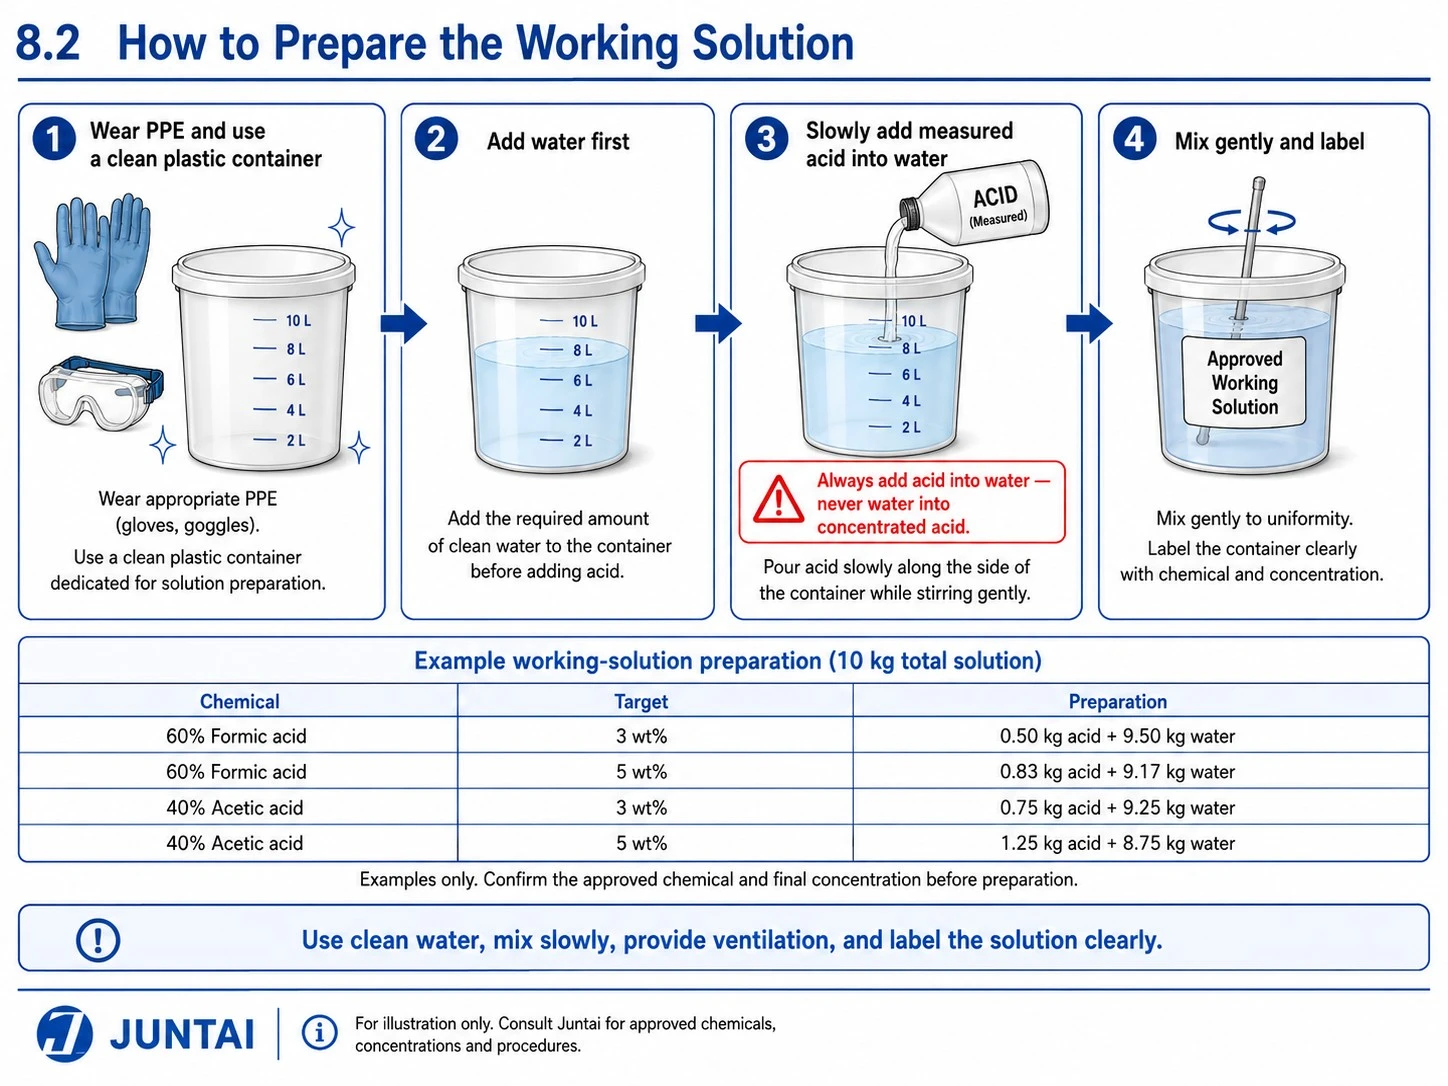
For field control, concentration by mass is preferred. The examples below prepare 10 kg of working solution. Always verify the concentration on the chemical supplier label/SDS before calculating.
| Commercial product | Target active acid | Commercial product required | Clean water required | Approx. ratio by mass |
| 60 wt% formic acid | 3 wt% | 0.50 kg | 9.50 kg | 1 : 19 |
| 60 wt% formic acid | 5 wt% | 0.83 kg | 9.17 kg | 1 : 11 |
| 40 wt% acetic acid | 3 wt% | 0.75 kg | 9.25 kg | 1 : 12.3 |
| 40 wt% acetic acid | 5 wt% | 1.25 kg | 8.75 kg | 1 : 7 |
Mixing rule: add acid slowly to water - never add water into concentrated acid. Use chemical goggles, face protection, acid-resistant gloves/apron and site-approved ventilation/containment. Never mix acid with bleach, sodium hypochlorite or any chlorine-containing chemical.
8.3 Step-by-Step Off-Line Chemical Cleaning
| Step | Procedure |
| 1. Confirm deposit | Use visual inspection plus a small deposit sample test. Chemical cleaning is justified mainly for hard acid-reactive mineral scale. |
| 2. Isolate diffuser | Shut down, depressurize, remove the diffuser/membrane if the site arrangement permits, and keep the membrane wet. |
| 3. Pre-clean | Rinse and gently brush off loose sludge first. Acid should not be consumed by removable solids. |
| 4. Prepare 3 wt% solution | Prepare enough solution to fully wet/cover the scaled membrane surface. Use a compatible plastic container. |
| 5. Contact for 20 min | Keep at ambient temperature. Gently move the solution every 5-10 minutes. Do not aggressively flex or scrub the membrane. |
| 6. Inspect | If most scale is removed, stop and rinse. If hard scale remains and membrane condition is normal, proceed to 5 wt%. |
| 7. Escalate if needed | Use 5 wt% active acid for 20-30 minutes. Do not exceed 60 minutes total contact in one cleaning session without Juntai approval. |
| 8. Rinse thoroughly | Use clean water until residual acidity is removed and rinse pH is close to the clean-water pH. |
| 9. Reinstall / test | Leak-check, purge with air for approximately 5 minutes within approved limits, then record normalized pressure, airflow and bubble pattern. |
| 10. Evaluate | If performance does not recover after one controlled cleaning session, stop repeating acid treatment and contact Juntai or replace the membrane as appropriate. |


8.4 In-Situ Acid Dosing Through the Air Header
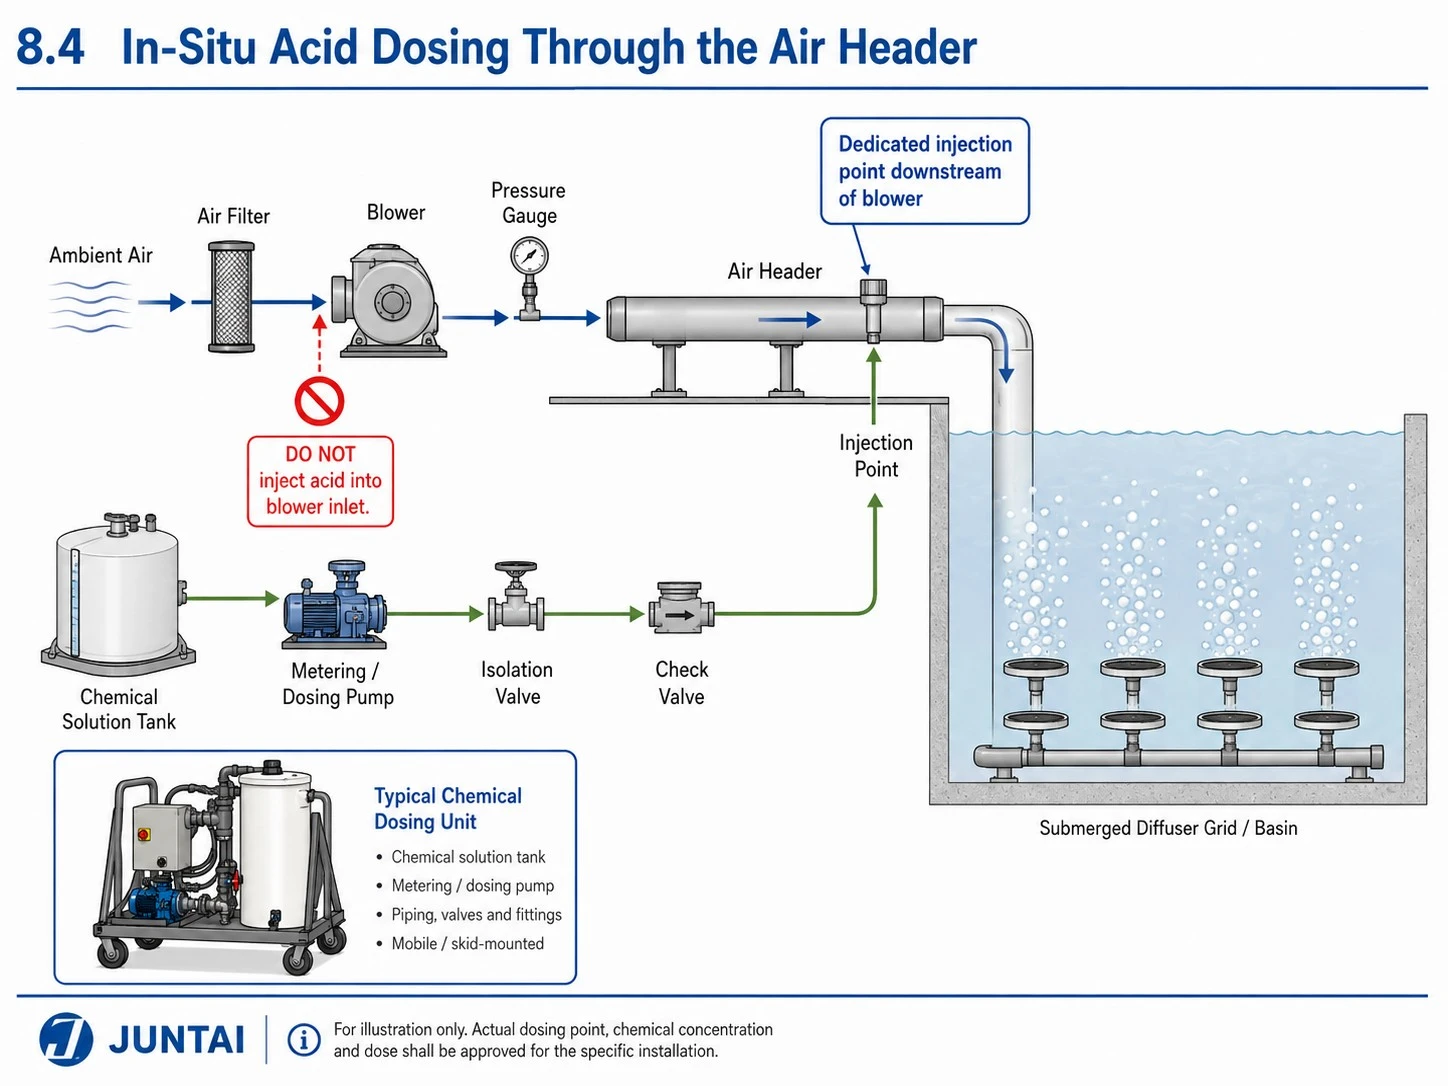
For small onsite/septic systems or any installation without a purpose-built chemical injection point, DO NOT pour or inject acid into the blower inlet or air piping. Use the off-line cleaning method instead.
In-situ acid dosing can be effective for carbonate scale, but it requires controlled atomization/injection, compatible piping and valves, a suitable dosing point, trained personnel and a project-specific dose. The exact quantity should not be published as a universal "mL per diffuser" value because the required amount depends on diffuser count and model, grid size, drop-leg arrangement, fouling severity, airflow, water chemistry, acid strength and the distance from injection point to diffuser.
| Requirement before Juntai issues an in-situ dose | Information required |
| Diffuser information | Model, quantity, membrane type, installation age and grid arrangement. |
| Operating baseline | Clean/new header pressure, current header pressure, total airflow or airflow per diffuser, water depth and blower data. |
| Fouling evidence | Photos of bubble pattern and membrane deposits; description of hard/soft deposit; any prior cleaning results. |
| Water chemistry | pH, alkalinity, hardness/Ca, Fe, Mn, chloride and any unusual process chemicals where available. |
| Injection system | Dosing point location, pipe material, valve material, atomizing/dosing equipment and containment method. |
| Safety controls | SDS, operator PPE, emergency wash, spill control, ventilation and plant approval. |
Industry practice uses formic acid for in-situ diffuser descaling; technical formic or acetic acid may be injected through purpose-built systems, but dose and frequency must be determined for the specific installation. Juntai should approve the chemical, concentration, dosing rate, contact/dosing time and post-cleaning purge before the customer proceeds.
8.5 Chemicals / Practices Not Approved as Default
- Acid mixed with chlorine, bleach or sodium hypochlorite - dangerous chlorine gas may be released.
- Concentrated hydrochloric, sulfuric or nitric acid as a routine field cleaner for Juntai membrane disc diffusers.
- Petroleum solvents, aromatic solvents, fuel, degreasers or unknown industrial cleaners.
- Hot acid soaking, prolonged soaking beyond the stated limit, or repeated acid cycles without performance review.
- Chemical injection at the blower inlet, upstream of sensitive valves/instruments, or through materials whose compatibility is unknown.
- Using chemical cleaning to "repair" a swollen, sticky, cracked, brittle or permanently domed membrane.

Clean or Replace?
Cleaning restores performance only when the membrane itself is still sound. Use this decision table before investing time and acid in a membrane that should be replaced.
| CLEAN when | REPLACE when |
| Deposits are visible but the membrane remains elastic. | The membrane is torn, cracked, punctured or detached. |
| Slits close normally after air shutdown. | The membrane is sticky, swollen, hard, brittle or chemically attacked. |
| No cracking, swelling, hardening or permanent doming is present. | The membrane remains permanently domed or slits remain open. |
| Pressure and airflow are expected to recover after deposit removal. | Cleaning does not restore acceptable pressure, airflow or bubble distribution. |
| Cleaning frequency remains reasonable and stable. | Cleaning is required at increasingly short intervals. |


Troubleshooting Quick Reference
| Symptom | Check first | Corrective action |
| Localized large bubbles | Pipe joint, adapter, membrane edge, visible tears | Repair leaks or replace damaged diffuser / membrane. |
| Uneven aeration across a tank | Blower output, valves, water level, pipe levelness, condensate | Correct the air-distribution problem before cleaning diffusers. |
| Higher pressure with lower airflow | Inlet filter, valves, pipe restriction, condensate, deposits | Remove air-side restrictions; then clean or replace membranes as required. |
| Low dissolved oxygen | Process loading, blower capacity, mixing, air leaks, diffuser condition | Correct process / air-supply causes, then address fouling. |
| Rapid return of fouling | Water chemistry, pretreatment, airflow and shutdown pattern | Correct the root cause and review material / cleaning strategy with Juntai. |


Maintenance Record
Record every inspection and cleaning so trends become visible. At minimum, log the date, operating age, water depth, airflow, header pressure, observation/action and next check date. A well-kept record turns vague "it seems worse" conversations into data-backed maintenance decisions.
Information to Send Juntai for Technical Diagnosis
| Equipment / operating data | Process / condition information |
| Diffuser model and quantity | Wastewater type and recent chemistry |
| Installation / start-up date | Photos of bubble pattern and deposits |
| Basin water depth | Cleaning history and chemicals used |
| Total airflow or airflow per diffuser | Recent shutdowns, oil exposure or process changes |
| Current header pressure and clean baseline pressure | Any chlorine/oxidizer, polymer or unusual chemical exposure |
| Blower model and operating data | Deposit sample / lab results if available |
Chemical Cleaning Approval Request - Minimum Data
| Field | Customer input |
| Site / project | |
| Diffuser model / quantity | |
| Membrane material | |
| Operating age | |
| Water depth | |
| Current airflow | |
| Clean baseline pressure / current pressure | |
| Deposit description | |
| Water pH / alkalinity / hardness / Fe / Mn | |
| Previous cleaning and result | |
| Proposed cleaning method: off-line / in-situ | |
| Chemical available and supplier concentration |
Juntai technical support should review site data before authorizing any non-standard chemical, concentration above the stated off-line working range, extended contact time, or in-situ acid dosing program.
Keep Your Disc Diffusers at Peak Oxygen Transfer
From fouling prevention and cleaning schedules to membrane selection, our engineering team can help you keep fine bubble aeration efficient. Explore our EPDM disc diffusers and request technical specifications.